antonioconte
Registered
Can anyone please help and advise, I have a client who wants me to change the white panels on this machine:
http://www.head2headbarbers.com/WO1Z0068.jpg
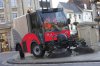
to the same red on this machine:
http://www.head2headbarbers.com/WO1Z0077.jpg
how easy is this?
What's the best proceedure for this?
thanks in advance
http://www.head2headbarbers.com/WO1Z0068.jpg
to the same red on this machine:
http://www.head2headbarbers.com/WO1Z0077.jpg
how easy is this?
What's the best proceedure for this?
thanks in advance
")

 This is something that takes dedicated practice to master.