Using M2 Mini to create El Capitan boot disk

rickself

Registered
Good Saturday - my Saturday project:
I am attempting to make a new bootable HD for my old Mac Pro 2008 FROM my new M2 Mini. But I can't get the installer to not want to install on my new Mini. I have a formatted 1gb drive in my dock. How do I get the installer to see the new HD? I just downloaded the dmg file from Apple.
To back up a bit, my old Mac Pro has been having startup issues and I want to try with an all new boot drive. I'm lost when it comes to commands in Terminal but am willing to try if that's what it takes.
Thank you!
Rick
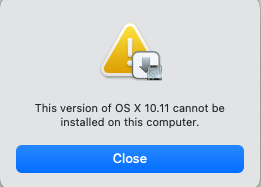
Screenshot 2024-03-02 at 2.49.27 PM.png
 
You can make a bootable installer on your M2 mini, which is a simple task through the terminal. All you need is a copy of the installer app for the system version that you want to use. But, that will just give you a bootable installer, which you cannot use from your M2 mini (it is not compatible with the El Capitan (OS X 10.11) system, and won't allow you to install that old system.
So, it seems that you have a bootable USB installer, so use that to boot your MacPro, and installl to your new drive, which you would either install in a slot on your MacPro, or with that drive in an external enclosure, connected to a USB port on your MacPro.
Okay. I think I get what you’re saying. Use the DMG file to create a bootable USB thumb drive. I have 128 GB thumb drive.
 
Sorry, I though, from your first post, that you already have a bootable USB installer made.

This will be a long post, as I want to post the steps to make your USB installer, and get past those "evil" terminal commands, too!
(Important question here), Does your MacPro boot successfully, so you can get to the desktop?
You need to copy that .DMG to your MacPro, then open the .DMG
That will mount to show you an installer .pkg. Run that installer, which will then "install" the installer app. It will appear in your Applications folder.
With that part done, you only need to use the terminal to make your bootable installer.
Here's some steps (where it gets kinda long)
Make installer bootable on flash drive:

Insert your USB flash drive (use a 16GB flash drive for this, if you have one). Erase that thumb drive, using your Disk Utility. Make sure it is formatted Mac OS Extended (journaled), and the partition Map is "GUID"

The macOS installer app (Install OSX El Capitan) should be in your Applications folder, but another location will be OK for creating the bootable installer that you need.

Right click on that installer app, and choose "Show Package Contents". Open the Library, then open the "Resources" folder. Leave that alone for a moment...

Launch your Terminal app, then, at the prompt, type sudo, and add a single space.

From the Resources folder that you left open, drag the file "createinstallmedia" and drop it on your terminal window. You will see the full path to that file appear next to sudo.

Next, type --volume, and add one space to that. (notice there are TWO dashes, not just one)

Now, find the icon for your flash drive (the one you just erased. Should be on your desktop somewhere). Drag that icon into the terminal window. You will see that disk, with its path, added to the line you have been typing.

Next, type --applicationpath, and again add one more space

Find your installer app (it's there in your Applications folder), then drag 'n drop that installer app into the terminal window. You will see the file path to that app appear in the terminal window.

And, now all the typing is complete, SO, press enter. You will be asked to enter your admin password.

You will NOT see the password as you type (it's a security feature), just type your password blindly, then press enter. It will work.

Finally, the terminal will ask you to press "y" to start the command that you just typed, so type y. and press enter.

Then, you will see some numbers appear, showing the progress of the command. Some flash drives will be slow, and can take 30 minutes. It will get to 100%, then do a few final items to complete the installer and make it bootable.
Again, it can take quite a long time to complete, and you will eventually see the prompt in the terminal window return to view.
And, it's ready to go!
(or, you will see an error, because something was entered incorrectly. I hope not, as I have tried to make this (relatively) fool-proof.)

Let me know how it goes for you.
When the USB installer is finished, you can simply reboot your MacPro (with your new USB installer in a USB port), while holding the Option key.
When you get the boot picker screen, select the installer, which SHOULD be one of the boot choices, and when that is selected, just press enter to boot to that installer.
Follow the steps to "Reinstall OS X"
 
Last edited:
Wow, DeltaMac, you saved the day for me before and this is quite the instruction sheet and I appreciate it. I had read about Terminal but I never realized Terminal you can drag and drop to complete the path. I will report back tomorrow with the results.
 
Wellll, this is turning into a bigger pain than I intended.
I haven't been able to boot the old MacPro, hence the reason to create the bootable USB on the M2.
So, on the M2, when I format the USB in Disk Utility, it doesn't give the option of GUID map. After formatting, the info shows Master Boot Record for the partition map.
Next, when I right click on the installer pkg inside the DMG, there is no "show package contents" option.
I think what I will do is take the hard drive from the 2008 MacPro at home to work where I have a similar 2012 MacPro, format the drive there as a startup drive with El Capitan and bring that home and pop it back in the MacPro at home. I was trying to avoid all that, I guess to prove to myself that I can do it - with some macosx help of course.
 
If you want to change the format (actually, the "scheme") to GUID, you have to erase the drive (the device), not just the partition.
You should see that the topmost item in the list for your drive in Disk Utility, will be the device (which shows the manufacturer's info/model number/etc, not just the partition name). If you don't see that, make sure that you go to the View menu, and choose "Show All Devices".
Now you will see the device as the topmost item, above the lines that show partition names.

Just to also help out, if you have the El Capitan .DMG -- you want to open that .dmg by double-clicking on that.
It will mount, showing you the installer .pkg file inside that disk image. Then, double-click THAT .pkg file, which will "Install" the actual installer app -- which is exactly what you need. It does NOT at that point actually install anything; it just puts the installer app together, and copies the installer app to your Applications folder, where you can find it. And, that installer app will respond to a right-click by showing you a choice to "Show package contents", and you can then continue on with making a USB installer, and continue on with a system install on your "reluctant" MacPro... (If this 75 year old guy can do it, so can you!)
 
You got me by seven years DeltaMac! I’ve been in prepress and on the Mac since 1986. Wouldn’t change it for anything.

Maybe I should have started by saying I’m running Ventura 13.6.4. Mac Mini M2.

I still didn’t see the GUID option in DU, so I ejected and reinserted the USB and then got that option. So that’s taken care of.
Opening the InstallMacOSX.dmg that I download from Apple gives me the InstallMacOSX container for the InstallMacOSX.pkg. When I double click the .pkg, the installer opens and after the compatibility test tells me that this version of OS X 10.11 cannot be installed on this computer. Only option is to close the window and the install quits.

I really don’t use this old Mac Pro very much anymore but it’s got programs on it that aren’t on the new Mac and I still like to use those. There is nothing out there now, or ever will be, like the old Mac Pro towers. Most reliable Macs I’ve ever used and still a staple in the graphics and print industry! So it’s not a life or death that I get it running, it’s more of a personal mission that I know I can do it!
Even at 68!
 
You can't do the installer setup install on the M2, because the M2 is not compatible/not bootable with El Capitan. So, won't allow copying the installer to a Mac that can't boot from that system version.
But, you could do it on the Mac Pro that you told me is at work. Keep in mind that when you install the installer app, it will launch itself on the shop MacPro, allowing you to install the El Capitan system on THAT MacPro. That's not what you want, so watch for it, and Quit the installer. All you need on the work MacPro is the installer app itself, which you would follow the steps to make the bootable installer (and not actually install that system on your work MacPro!)
 
Apple keeps throwing up hurdles.
Apparently the installer is looking for an installed version to update and won't install 10.11 and of course there is no download for just El Capitan before upgrades.

Screen Shot 2024-03-04 at 12.16.31 PM.png
 
I can’t get to the point of right clicking on the installer and having it show the contacts. Maybe because I’ve been using an update instead of the original El Capitan. I did download what I think is the original El Capitan but won’t get to try it until tomorrow.
UPDATE: I can see the contents of the file I downloaded from Internet archive website. Now maybe I can at least get the bootable USB drive done tomorrow.
 
Last edited:
I give up.
The Internet Archive install file was corrupt. So I downloaded the full install Cheryl linked above and it won't install because it is apparently an update and a version of Mac OS has to be on the receiving disk.
I surrender to Apple!
I gave in and ordered a USB startup drive from eBay for $20.
Thank you DeltaMac and Cheryl. I learned more about Terminal than I could ever learn any other way.
 
Sorry we couldn't get you going.
But, I think you came to a wrong conclusion. If you downloaded the dmg for El Capitan, opened that and ran the file inside to complete the installer app for El Capitan, then you did NOT get an updater. It was, in fact, a full installer, 6.22GB in size. Full install, which means that you can install that system to a blank drive, if that's what you have. That full install will install OS X 10.11.6, which is certainly an update for the original 10.11, of course, but is not just an update, it would be (and Is) a full install. If you didn't end up with that 6.22GB full installer, then you simply missed a step of preparation.
That said, I also accept that sometimes you have to "know when to fold 'em". If you purchased a USB El Capitan installer, you will find out it is (or should be) version 10.11.6 of the full system install--the same 6.22GB installer that you already have.

There is an updater for El Capitan, which combines all updates , from 10.11.1 to 10.11.6, known as a combo update, which can update any El Capitan system to 10.11.6. THAT updater is only 1.5GB in size, and includes "Combo" in the name of the installer. It is also not a bootable updater. You simply run it on any El Capitan system. That will not install unless El Capitan is already installed.

Good Luck, sorry I could not help you complete your install.
 
I appreciate all the help and encouraging words. I’m an Aries! I rarely give up, wave the flag of surrender. I love the Mac, I hate PCs! But to me, the $20 was less expensive than the time I was losing and not getting anywhere. I lost my wife a year and a half ago and feel now more than ever that time is invaluable
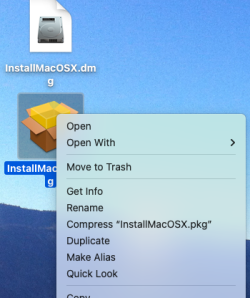
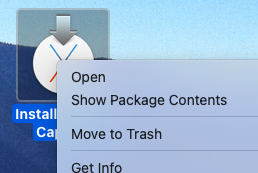
Anyway, that being said, what I kept running into is that nothing I downloaded from Apple had the right click option of ‘show package contents’. And maybe it was the OS I was working on. My Mac pro at work has Mojave. It’s a 2012 Mac, but it’s not as old as what I’m trying to get going here at the house. They were all that 6.22GB. The file I downloaded from Internet archives, that one was the only one that had the option to show contents. The left screenshot is what I downloaded from Apple, and doesn’t show the ‘Show Package Contents’. The screenshot on the right (with the X), is the one that I got from Internet Archives and it did actually give me the option to show package contents.
I’ll mess around with it again on weekends just cuz.
 

Attachments

  • Screenshot 2024-03-05 at 9.34.21 PM.png
    Screenshot 2024-03-05 at 9.34.21 PM.png
    191.9 KB · Views: 1
  • Screenshot 2024-03-05 at 9.33.48 PM.png
    Screenshot 2024-03-05 at 9.33.48 PM.png
    58.2 KB · Views: 1
The difference is the type of file in those two screenshots.
The first is the result of running the download .dmg file, which is an installer package (a .pkg file) The package contents are not viewable.
If you launch that .pkg file, it will output the installer app that you show in your second screenshot.
The second is the actual installer app. Apps typically can show package contents.
 
Back
Top